
Corralling Your Food Containers
/Last month when I was posting a lot on Instagram about things I use to keep my condo and life organized, I got a request to show what I do about food storage. Knowing that this particular IG follower is a busy, working mom of two kids, I didn’t think an example from my place would be super relevant. I have the luxury of being the only person living here, and I only need so many containers given how much I cook. It isn’t a ton of containers, and I’ve already done a few purges while I was converting all my containers to glass (though I keep a few plastic ones to send with my boyfriend so I don’t lose sleep over whether they make their way back into my cabinet or not).
In light of that, I took to Pinterest to gather a few examples of how I might approach organizing food containers in one of my client’s homes.
Before I get into the examples, here are the first few steps to a food storage project:
- Gather all your containers together.
- Make sure they are all clean and ready to be put away.
- Sort it all into categories (round, square, rectangular, etc.) and make sure EVERY CONTAINER has its matching lid!
- Get rid of all the items without a mate!
- Take a look at what you have left. Do you use it all regularly? Is it in good condition (e.g. does it smell, have stains, have melted or degraded spots from years of use?)? If the answer to either of is no, get rid of it! If you don’t know what you use regularly, try putting a piece of painter’s tape on each item. When you use it, take it off. After a couple weeks, it’ll be pretty clear what you’re not using.
- Make a list of anything you need to replace or anything you find yourself running out of often. Remember, you don’t need to buy a whole new set. With Amazon, IKEA and a number of other retailers, you can buy things one at a time, so you have just enough.
Now, on to the fun part – looking at all the pretty, pretty organizing pictures!
I’m just going to go ahead with my favorite first from none other than Martha Stewart! If you are fortunate enough to have a drawer you could designate for this, I love the fact that you can see everything so easily at a glance. The same sized lids are kept tidy by using dividers, and the containers are nested inside each other. You can find a link to the dividers in the caption.

Similar to the Martha Stewart example above, this version has containers stored in a drawer, but the lids are paired with the corresponding container. It is kept tidy by way of book bins flipped on their sides. The same effect could be achieved with small boxes as well.

A fancier version of book bins or boxes is this beauty! DIY or purchase dividers so every size of container and its lid has a place.

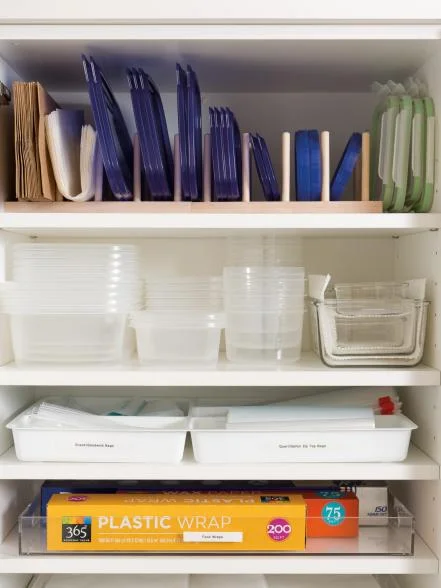
However, if you think something adjustable is more your speed, try this pegboard version.

Here, they use bins to store containers and lids separately. Smaller containers are stored with their lids on. A riser/cabinet shelf/helper shelf lets you get at each type with less stacking.

Lastly, this last option uses a plate rack to keep lids separated by size. Personally, I do not think this would not work quite as well in a deep cabinet, as the lids would likely fall off the back of the plate rack. But it could work pretty well in your typical upper cabinet. Be sure not to place things too high, especially if you want the kids to help clean up after dinner!
Remember, it doesn’t take a lot of fancy products to get organized. Start by editing your collection down to what you really use regularly and repurpose what you already have, like shoe boxes, to contain your collection. Once you find a system that works for you and the family, then think about replacing the shoe boxes with something your find more visually appealing (or not! Aesthetics aren’t important to everyone).
I hope you all find this helpful! If you have any specific questions, I'd be happy to answer. Just put your thoughts in the comments below. Happy organizing!